Hosting a Webhook SmartApp
This document describes how to create a Webhook SmartApp.
Steps
The following are the general steps needed to create a Webhook SmartApp. Additional details will be provided in the following sections.
- Create a web service application. See the SmartThings Node SDK or SmartThings Java SDK for an easy way to get started.
- Register your Webhook SmartApp with SmartThings. You will need a publicly accessible HTTPS url.
- Verify your domain ownership using the confirmation lifecycle.
- Ensure that all incoming HTTP traffic is properly authorized to have originated from SmartThings.
Ensure that your webhook has an HTTPS URL. You can use free tools such as ngrok or Let’s Encrypt to enable your webhook with HTTPS (SSL/TLS).
Verify your domain ownership
Verification is the process of proving that you own the domain that you desire to register as the root for a Webhook SmartApp. We need to confirm ownership to ensure SmartThings is not sending unsolicited HTTP traffic to a domain.
Confirmation Lifecycle
Verification is provided through successful completion of the confirmation lifecycle. During the confirmation lifecycle your Webhook SmartApp will receive an HTTP request like the following to the target url you previously specified:
{
  "lifecycle": "CONFIRMATION",
  "confirmationData": {
    "appId": "{YOUR_APP_ID}",
    "confirmationUrl": "{CONFIRMATION_URL}"
  }
}
Upon receipt your SmartApp should print out the request body. Next, you'll need to issue an HTTP GET request to the provided confirmationUrl. This can be done by simply copy/pasting the confirmationUrl into a browser search bar.
The provided confirmationUrl is only valid for a short time. It can manually be resent at anytime via the Dev Workspace, or by making the following HTTP call:
curl --request PUT \
--url https://api.smartthings.com/apps/${APP_ID}/register \
--header "Accept: application/json" \
--header "Authorization: Bearer ${PAT_TOKEN}" \
--data '{}'
Ping Lifecycle
The ping lifecycle is a deprecated mechanism used for verifying domain ownership. It requires the Webhook SmartApp to be fully available at the time of registration. During registration the Webhook SmartApp must correctly respond to the challenge in sync to initial request.
Authorizing calls from SmartThings
HTTP Signatures
All requests sent by SmartThings are digitally signed in accordance with the IETF HTTP Signatures Draft 3 specification. A full discussion of HTTP signature verification is beyond the scope of this document; consult the specification referenced above, or see Joyent's page on http signing for more information.
Authorization Flow
Currently, SmartThings provides 2 mechanisms for which signatures are generated.
- Using a publicly available SmartThings generated x.509 certifcate.
- Using the public / private key generated during SmartApp registration.
The following diagram outlines the general flow for both signing mechanisms.
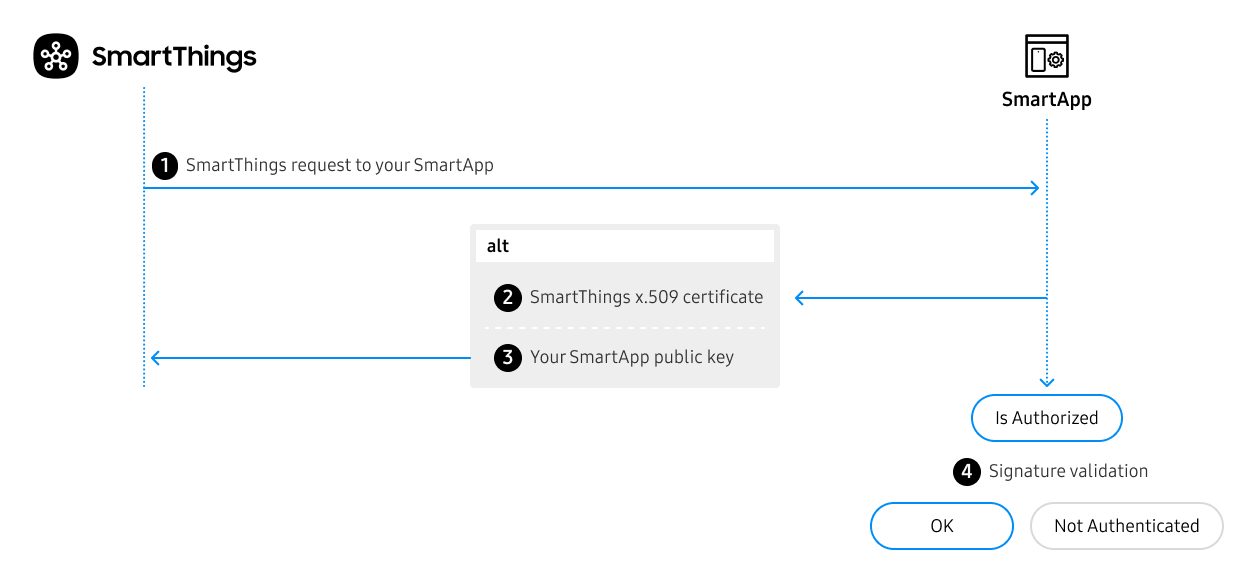
- Request made by SmartThings to your SmartApp.
Authorization: Signature keyId="<aKeyId>",signature="<aDigitalSignature>",headers="<aHeadersSet>",algorithm="<aSigningAlgorithm>"
- Depending on the elected signing mechanism (SmartThings x.509 Certificate or SmartApp Public Key), the
keyIdfield in the Authorization header will vary.- If SmartThings x.509 ⟶ SmartApp should call
https://key.smartthings.com + <aKeyId>to fetch the correct public key for signature verification. - If SmartThings Public Key ⟶ Fetch public key via the mechanism you implemented to store. This is same public key provided during registration.
- If SmartThings x.509 ⟶ SmartApp should call
- SmartApp computes the validity of the signature using the resolved key combined with the HTTP Headers provided on callback request.
Using SmartThings x.509 Certificate
A Webhook SmartApp will receive requests digitally signed by one of the publicly available SmartThings x.509 certificates.
This approach has the following benefits:
- Increased security as the certificates are rotated periodically.
- Ease of use. You are no longer required to deploy copies of your SmartApp's public key alongside your integration.
On each request, the Webhook SmartApp will lookup / cache the certificate referenced by the HTTP Signature keyId attribute. It will then use that certificate to verify the signature was generated by SmartThings.
Using SmartApp Public Key
This method is deprecated.
Using the SmartApp's public key was the original approach for SmartThings callback authorization.
This mechanism requires you to copy the public key you received during SmartApp registration into your SmartApp container, and use it to verify that the signature provided on the Authorization header originated from SmartThings.
Newly created SmartApps will be opted into the above SmartThings x.509 Certificate method. Existing SmartApps will continue to use the public key method documented in this section.
However, they may opt-in at anytime to leveraging SmartThings x.509 Certificate by following the next section.
Opt in your SmartApp
To opt into using the SmartThings x.509 certificate for digital signing, make a simple API call.
You will need a Personal Access Token and your SmartApp's App ID, which can be found in the Developer Workspace.
Request
curl --request PUT \
--url https://api.smartthings.com/apps/${YOUR_APP_ID}/signature-type \
--header "Accept: application/json" \
--header "Content-Type: application/json" \
--header "Authorization: Bearer ${PAT_TOKEN}" \
--data '{ "signatureType": "ST_PADLOCK" }'
Response
202 {}
Additionally, a SmartApp can revert back to using the associated public key:
Request
curl --request PUT \
--url https://api.smartthings.com/apps/${YOUR_APP_ID}/signature-type \
--header "Accept: application/json" \
--header "Content-Type: application/json" \
--header "Authorization: Bearer ${PAT_TOKEN}" \
--data '{ "signatureType": "APP_RSA" }'
Response
202 {}
The request to change the signature type of your SmartApp is processed asynchronously. It may take up to a few minutes for the change to fully take effect.
Example
The recommended and easiest way to implement the callback authorization logic in your SmartApp is to use one of the official SDKs.
Currently SDKs are available for both NodeJs and Java ecosystems. They can be found on Github @:
The following uses the SmartThings Node SDK.
/**
 * A very simple SmartApp example leveraging the SDK
 * to launch a SmartApp on the Express web framework.
 *
 * All SmartThings callback authorization mechanisms
 * are implicitly supported through SDK usage.
 */
const express = require('express');
const SmartApp = require('@smartthings/smartapp');
const server = express();
const PORT = 5555;

server.use(express.json());

const smartapp = new SmartApp()
// If you do not have it yet, omit publicKey() - i.e. PING lifecycle
// Usage of '@' symbol informs SDK to fetch from local disk using `fs` package.
//  .publicKey('@smartthings_rsa.pub')
    .enableEventLogging(2)
    .page('mainPage', (context, page, configData) => {
        page
            .name('SmartApp Authorization Example')
            .complete(true)
            .section('my-section', section => {
                section
                    .paragraphSetting('my-paragraph')
                    .text('SmartApp Authorization Example')
                    .description('An example of how to authorize incoming SmartThings requests to your SmartApp.')

            })
    });

server.post('/', (req, res, next) => {
    console.log(req.header('Authorization'));
    smartapp.handleHttpCallback(req, res)
});

server.listen(PORT, () => console.log(`Server is up and running on port ${PORT}`));