Rules
Rules are a versatile tool, enabling you to automate the Devices and services that connect to the SmartThings platform. Rules are useful for manipulating Devices automatically when a specific event is triggered, for automating repetitive tasks such as adjusting a light as specific intervals, and for providing users with "set it and forget it" functionality.
We believe that speed is critical to ensuring a great user experience. That's why, when possible, Rules execute locally on a Hub. In order for Rules to execute locally, all Device features and services involved in the Rule must support local execution. Rules involving features or services that do not support local execution are run in the SmartThings Cloud.
Rules can be found in the Routines tab of the SmartThings mobile app and are represented as Automatic routines. See Routines in SmartThings to learn more about routines in the SmartThings app.
Visit the Rules API documentation to learn more about the Rules API calls available to you. When you’re ready to start creating Rules, visit our Rules API community page where you can find tutorials on getting started, plus expanded Rule examples, and more.
When a user installs a Rule, only the owner of the SmartThings account the Rule is installed on can modify the Rule. This means that as a developer, you will not be able to make updates to any Rules you create that other users install on their accounts.
If you instead want to run automation logic on your own platform, have the ability to update automation logic after user installation, create a standalone application, or interact with the SmartThings API, refer to Service Integrations for an alternative to Rules.
The Structure of a Rule
A Rule is defined in JSON format and contains a name, install source, and a list of actions. A single Rule can be used to contain multiple actions within it. These actions represent a tree that is evaluated when the Rule is triggered.
Actions are a core component of the Rules API and define how a Rule behaves. Let's take a look at an example Rule to get a better understanding of the structure and syntax in use.
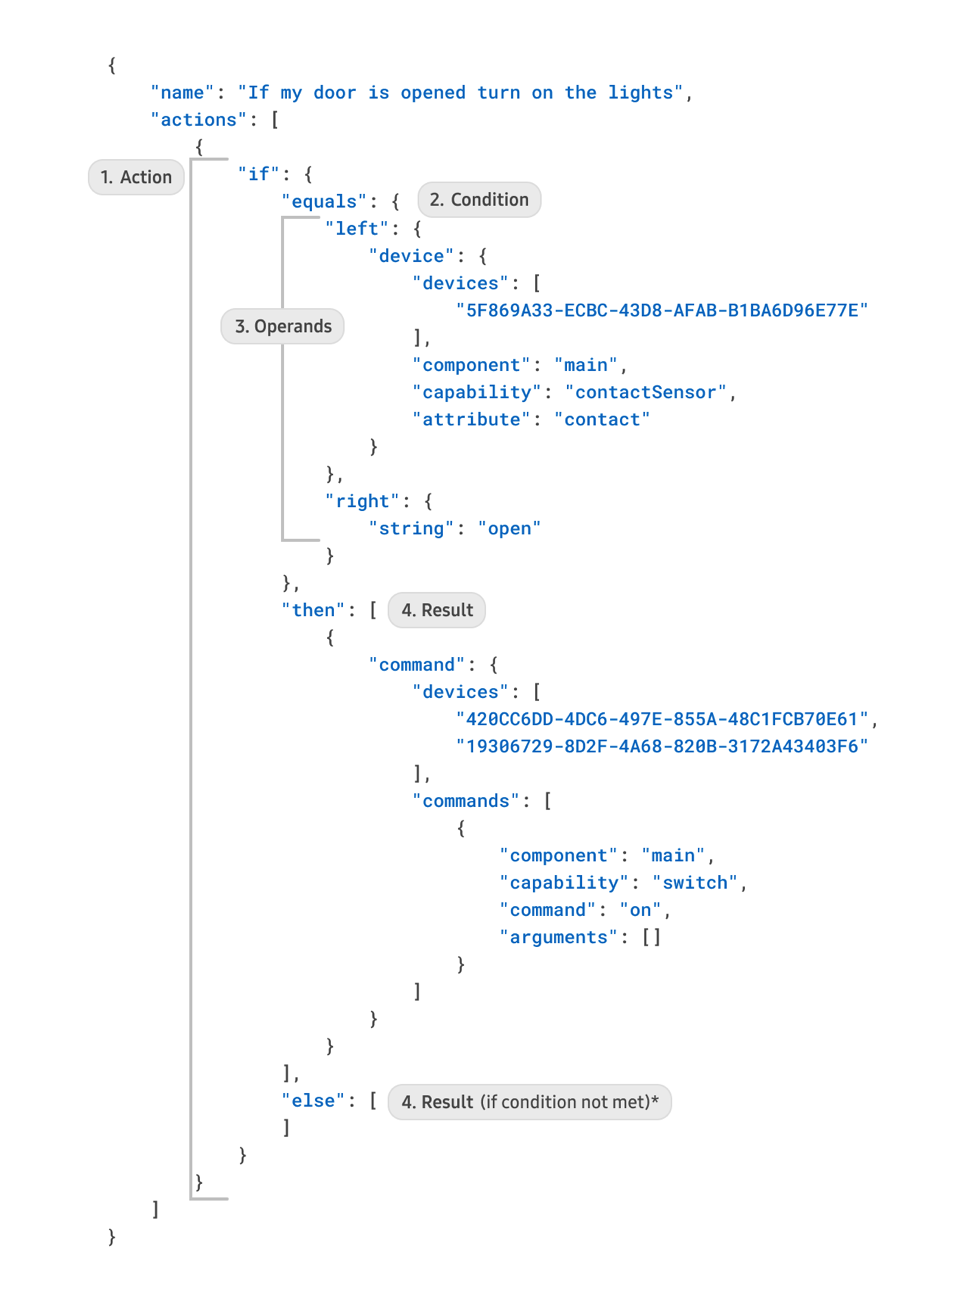
This Rule compares the device’s contact sensor (the left side of the equation) to the value defined in the right side of the equation.
Here's a breakdown of the Rule above:
- Action - An Action defines what task the Rule is completing. An Action is contained within the
actionsarray - multiple Actions may be specified in a single Rule. In this case, the Action is anifstatement. - Condition - An evaluation used as a trigger for the action. A Condition is evaluated during Rule execution and is contained within an action. In this case, the Condition is an
equalsstatement - Operands - The devices or locations involved in a Rule. In this case, a contact sensor and switch are included in the Rule.
- Result - In this case, an Action. The command(s) the Rule will perform if the Condition (
equals) is met. If the Condition is not met, any code in theelseblock will be executed.
Actions
For a complete list of Actions, Conditions, and Operands, and the requirements of each data type, visit the Rules API documentation.
An Action consists of one or more Conditions. The type of Action you use will determine the Conditions available for use. Visit our GitHub page to view example Automations and see the formatting each type of condition uses.
Below are some commonly used Actions:
if- Performs the action(s) specified in thethenstatement if the condition evaluates to true. Otherwise, theelsestatement will be executed.sleep- Specifies a time interval to wait before executing the remaining code in the condition statement.command- A simple condition used to manipulate one or several devices.every- Each time the specified condition is met, perform a given action.
Conditions
A Condition is nested within an Action and consists of one or more operands. The type of condition you use will determine the type and number of operands required. For example, a lessThanOrEquals condition requires two operands, left and right. Visit our GitHub page to view example Automations and see the formatting each type of condition uses.
Below are some commonly used Conditions:
and+ornotequalsgreaterThan+lessThangreaterThanOrEquals+lessThanOrEqualsbetweenchanges
and + or
"if": {
   "and": [
       {
           "equals": {
               "left": {
                   "location": {
                       "attribute": "Mode"
                   }
               },
               "right": {
                   "string": "<insert-the-mode-id-here>"
               }
           }
       },
       {
           "between": {...}
       }
   ],
   "then":[...]
}
not
This Condition inverts the operation. In the example below, if the switch’s current state is different than on, the condition evaluates to true.
"if": {
   "not": {
       "equals": {
           "left": {
               "device": {
                   "devices": [
                       "<insert-device-id-here>"
                   ],
                   "component": "main",
                   "capability": "switch",
                   "attribute": "switch"
               }
           },
           "right": {
               "string": "on"
           }
       }
   },
   "then":[...]
}
equals
This Condition compares a left and right side for equal values.
In this example, the switch device operand given on the left side is evaluated against the string given on the right side. When the left and right values are equivalent, the condition is evaluated as true.
"equals": {
    "left": {
        "device": {
            "devices": ["<insert-your-device-ID-here>"],
            "component": "main",
            "capability": "switch",
            "attribute": "switch"
        }
    },
    "right": {
        "string": "on"
    }
}
Since the attribute devices is an array, several devices may be added. Visit the aggregation operand of the Rules API for more info on the behavior of the equals Condition when including multiple devices in a Rule.
The aggregation operand is available on the following Conditions: equals, greaterThan, greaterThanOrEquals, lessThan, lessThanOrEquals and between.
greaterThan + lessThan
These conditions check if a value given on the left side is greater or less than the current value of an attribute specified on the right side.
In this example, if the switch’s current level is greater than the specified integer, the condition is true.
This Condition will evaluate to true for each event that is greater than (or less than) the specified value. For example, if you use
greaterThanto control your thermostat when the temperature rises above 50, the Rule will evaluate to true and run for each interval over 50. To have a Condition run only once when a value changes to above (or below) a set point, wrap thechangesCondition around the currentgreaterThanCondition.
"greaterThan": {
    "left": {
        "integer": 50
    },
    "right": {
        "device": {
            "devices": ["your-device-id-here"],
            "component": "main",
            "capability": "switchLevel",
            "attribute": "level"
        }
    }
}
lessThanOrEquals + greaterThanOrEquals
These Conditions are variations on lessThan and greaterThan and add a secondary check for equality.
In the example below, a specified integer on the left side is evaluated against the current level of a switch. If the switch’s current level is less than or equal to the specified integer, the condition is true.
This Condition will evaluate to true for each event that is greater than (or less than) the specified value. For example, if you use
greaterThanOrEqualsto control your thermostat when the temperature is equal or greater than 50, the Rule will evaluate to true and run for each interval at 50 and above (run once at 51, run again at 52, etc.). To have a Condition run only once when a value rises above (or below) a set point, wrap thechangesCondition around the currentgreaterThanOrEqualsCondition.
"lessThanOrEquals": {
    "left": {
        "integer": 50
    },
    "right": {
        "device": {
            "devices": ["your-device-id-here"],
            "component": "main",
            "capability": "switchLevel",
            "attribute": "level"
        }
    }
}
between
Check if a given attribute is between two provided values.
In this example, if the attribute level falls between the start and end integers, the Condition is true.
"between": {
    "value": {
        "device": {
            "devices": ["your-device-id-here"],
            "component": "main",
            "capability": "switchLevel",
            "attribute": "level"
        }
    },
    "start": {
        "integer": 50
    },
    "end": {
        "integer": 75
    }
}
changes
changes is a Condition that tracks the state of the operation it contains, returning true when the state of the inner operation transitions from false to true.
changes with lessThan
In the example below, the Condition evaluates to true if the dimmer’s switch level changes to less than the given value of 50. It will not evaluate to true again until the dimmer first changes to 50 or above, and then changes to below 50 again.
"changes": {
    "lessThan": {
        "left": {
            "device": {
                "devices": [
                    "{{your-device-id-here}}"
                ],
                "component": "main",
                "capability": "switchLevel",
                "attribute": "level",
            }
        },
        "right": {
            "integer": 50
        }
    }
}
Operands
Operands are used within Conditions. The operand is evaluated against a value (often an integer or string) specified in the condition you elect to use for your Rule. Simply put, an operand is generally the Device or Location you want to evaluate in a Rule.
Commonly used operands include:
device- For evaluating a device attribute.location- For evaluating a location mode state.array- An array containing multiple operands.specific- A specific instance under which the operation evalutes to true.trigger- Referred to as "preconditions" in the SmartThings app. A precondition or trigger can be used to prevent a Condition from triggering and executing a Rule.
specific
This operand is used in conjunction with the every Action and gives a specific instance under which the operation evaluates to true.
In the example below, the Condition will evaluate to true every day at 10:55 AM and change the specified location’s mode.
"every": {
   "specific": {
         "reference": "Noon",
         "offset": {
             "value": {
                 "integer": -65
             },
             "unit": "Minute"
         }
   },
  "actions": [
       {
           "location": {
             "mode": "your-location-mode-id-here"
           }
       }
   ]
}
trigger
Use a trigger, or precondition, to specify exactly which Conditions should and should not trigger Rule execution.
When you include several conditions in a Rule, each condition may act as a trigger. This means that as soon as any condition specified as a trigger evaluates to true, the Rule will execute (e.g. the then block in an if Action will execute).
- Use
"trigger":"Never"to prevent a Condition from triggering a Rule. - Use
"trigger":"Always"to ensure a Condition can trigger a Rule.
If trigger is not explicitly specified, "trigger":"Auto" is used by default in each Condition. This means that the Automation server will examine all Conditions used in the Rule and determine which Conditions should be used as triggers, based on each Condition's functionality.
For example, in the skeleton rule structure below, the Automation server will assign the REMAINS Condition as a trigger, while the EQUALS Condition will not be assigned as a trigger for the Rule:
IF
  AND
  EQUALS
    trigger:Auto
  REMAINS
    trigger:Auto
In the example Rule below:
- The
ifAction withequalsCondition specifies that ifbutton-device-idis pressed (the use of"trigger":"Always"dictates that this Condition is used as a trigger for this Rule),thenthe Rule will check whetherswitch1-device-idis on. - If
switch1is on,thenthe Rule will turnswitch2-device-idon. The use of"trigger":"Never"in thisthenstatement prevents this Condition from triggering the Rule wheneverswitch1is on; this Condition is instead used as a check for the remaining Rule logic, determining the next actions of the Rule. - For all other cases (
else), the Rule will turnswitch2off.
{
    "name": "Sample for precondition",
    "actions": [
        {
            "if":{
                "equals": {
                    "left":{
                        "string": "pushed"
                    },
                    "right":{
                        "device":{
                            "devices":["button-device-id"],
                            "component": "main",
                            "capability":"button",
                            "attribute":"button",
                            "trigger":"Always"
                        }
                    }
                },
                "then":[
                    {
                        "if": {
                            "equals": {
                                "left": {
                                    "device": {
                                        "devices": [
                                            "switch1-device-id"
                                        ],
                                        "component": "main",
                                        "capability": "switch",
                                        "attribute": "switch",
                                        "trigger":"Never"
                                    }
                                },
                                "right": {
                                    "string": "on"
                                }
                            },"then":[
                            {
                                "command": {
                                    "devices": [
                                        "switch2-device-id"
                                    ],
                                    "commands": [
                                        {
                                            "component": "main",
                                            "capability": "switch",
                                            "command": "on",
                                            "arguments": []
                                        }
                                    ]
                                }
                            }],"else":[{
                                "command": {
                                    "devices": [
                                        "switch2-device-id"
                                    ],
                                    "commands": [
                                        {
                                            "component": "main",
                                            "capability": "switch",
                                            "command": "off",
                                            "arguments": []
                                        }
                                    ]
                                }
                            }]
                        }
                    }
                ]
            }
        }
    ]
}