Device Basics
Devices are physical products that connect to and operate with the SmartThings platform.
A Device Profile defines the features and functionality of a Device. These features are broken down into individual components called Capabilities. Capability Presentations then describe how a Capability is displayed in a SmartThings client, such as in the SmartThings app.
SmartThings provides a list of standard Capabilities to quickly get you started with your Device integration. Custom Capabilities allow you to create your own Capability and define the unique features of your Device.
A Device Preference is a configuration that enables users to customize the behavior of their Device. You may wish to implement Device Preferences when integrating your Device with SmartThings to provide users with a way to customize their Device's behavior.
Development Workflow
To integrate a device with the SmartThings platform:
- Pick a device type that best suits your needs.
- Build your device integration. The SmartThings SDKs on our GitHub page contain example device integrations and tools to help you get started. For Hub Connected Devices, we recommend getting started with the Edge Device Builder.
- Test your device.
- Publish your device.
Device Types
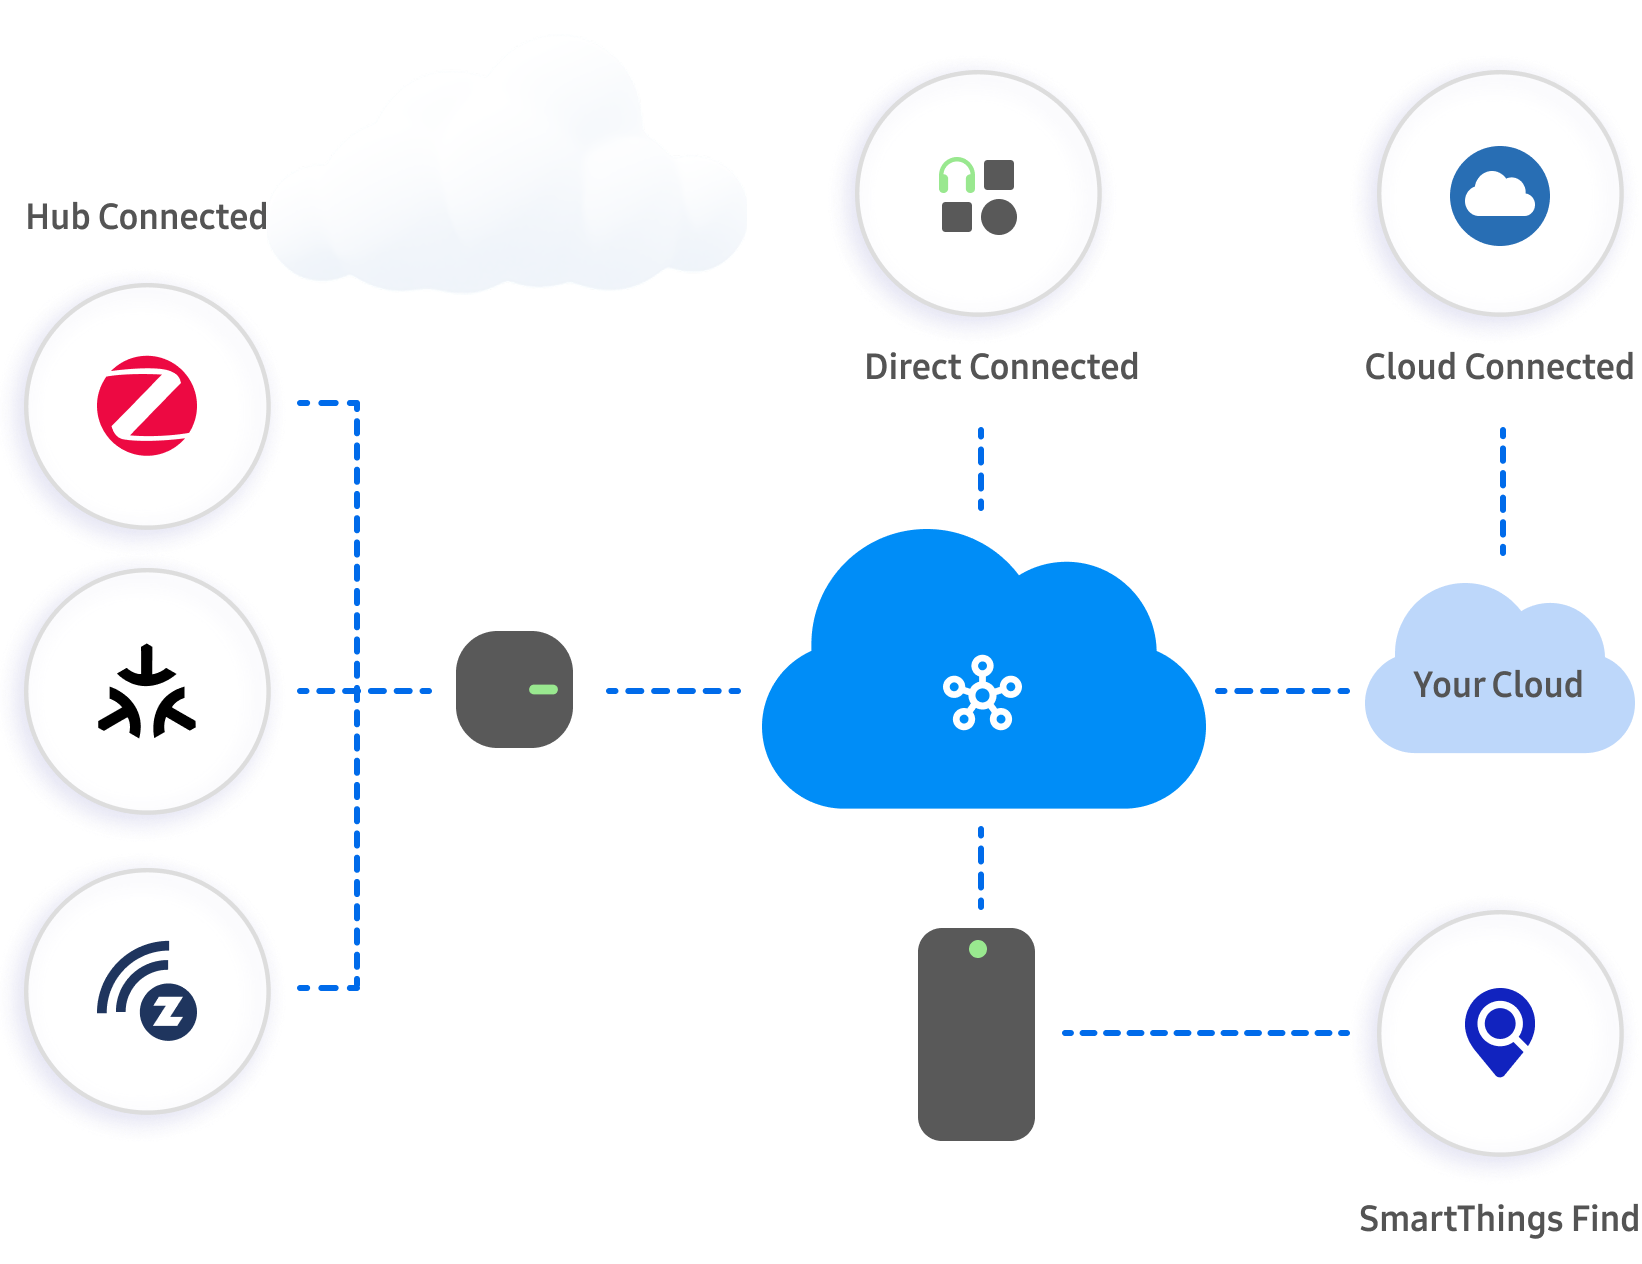
The SmartThings platform supports the following device integration types:
- Hub Connected Devices - Connect Matter (including Matter over Thread, Wi-Fi, and Ethernet), Zigbee, Z-Wave, and LAN devices to SmartThings-compatible Hubs.
- Cloud Connected Devices - Connect devices on your existing cloud to the SmartThings platform.
- Direct Connected Devices - Connect your Device directly to the SmartThings platform via WiFi.
- Mobile Connected Devices - Bluetooth devices connected to a Samsung Galaxy device can be controlled in the SmartThings app. SmartThings Find enables compatible Devices to quickly and easily be located using the SmartThings app.
categories supported by the platform?A device category is a high-level entity (like AirPurifier, Buttom, or Thermostat) that tells the platform what kind of device it is interacting with. Visit Device Profiles - Categories to learn more.
Device Events
Device events are structured, lightweight messages that communicate the state of device capabilities to the SmartThings platform and SmartThings clients.
When you develop a custom device integration, ensure that your device driver emits a device event when the state of a capability changes (e.g. when a switch turns on), so that clients such as the SmartThings mobile app can refresh the state of the device. Device events should be small and must not be used to track the complete state of a device domain. Device events must not contain extraneous data. Devices should generally not emit more than one event per minute, unless their state has changed as a result of user interaction (such as turning a switch on). SmartThings may adjust device events as necessary to support the SmartThings platform.
Namespaces
A namespace is an identifier used to group a developer’s Capabilities or Preferences together. When you create a
custom Capability or a Device Preference, it is created under your namespace. A unique namespace is created for you
when you create your first custom Capability or Preference for your developer account; only one namespace per account
is generated. A namespace may look something like perfectlife6617.
Manage Devices With the Devices API
Interact with the Devices API to access devices integrated with the SmartThings platform. The Devices API allows you to control devices connected to the SmartThings platform, access device metadata, and access device states.
You will need a Personal Access Token (PAT) with the appropriate scopes to interact with the Devices API.
Example Payload Using Postman
This example uses the Postman app to send a GET request to https://api.smartthings.com/v1/devices/<deviceID> for a Z-Wave door lock.
- Begin by creating a new
GETrequest in Postman. - Enter the request URL:
https://api.smartthings.com/v1/devices/<deviceID>where<deviceID>is the device ID of the device you want to retrieve info for. - In the Authorization tab of your
GETrequest in Postman, select Bearer Token as your authorization type. Enter your PAT in the Token field.
Use variables in Postman to keep your PAT secure and to easily authorize future API requests made from Postman.
- Click Send in Postman. Below is the payload from the
GETrequest:
{
  "deviceId": "3e04c330-d046-446c-b3e9-3edc22bf78ed",
  "name": "Door Lock",
  "label": "Front Door Lock",
  "deviceManufacturerCode": "003B-6341-5044",
  "manufacturerName": "SmartThingsCommunity",
  "deviceModel": "6341-5044",
  "presentationId": "7a15b375-294d-37fc-9ebe-000aea7436c8",
  "locationId": "8a2fa0bd-9e5a-4798-970b-c2ad73671ec9",
  "roomId": "95b1b353-d9e9-4ed0-8c83-a25fd44b93f8",
  "sharedLocations": [],
  "components": [
    {
      "id": "main",
      "label": "Door Lock",
      "capabilities": [
        {
          "id": "lock",
          "version": 1
        },
        {
          "id": "lockCodes",
          "version": 1
        },
        {
          "id": "battery",
          "version": 1
        },
        {
          "id": "refresh",
          "version": 1
        }
      ],
      "categories": [
        {
          "name": "SmartLock",
          "categoryType": "manufacturer"
        }
      ]
    }
  ],
  "createTime": "2022-03-07T22:22:17.726Z",
  "parentDeviceId": "e061df47-ec9b-42f2-beef-81606b87d268",
  "profile": {
    "id": "8d99f687-b7d8-3650-b3be-57e13e17883b"
  },
  "zwave": {
    "networkId": "4D",
    "driverId": "0f206d13-508e-4342-9cbb-937e02489141",
    "executingLocally": true,
    "hubId": "e061df47-ec9b-42f2-beef-81606b87d268",
    "networkSecurityLevel": "ZWAVE_S0_LEGACY",
    "provisioningState": "PROVISIONED"
  },
  "type": "ZWAVE",
  "vid": "7a15b375-294d-37fc-9ebe-000aea7436c8",
  "mnmn": "SmartThingsCommunity",
  "ocfDeviceType": "oic.d.smartlock",
  "restrictionTier": 0,
  "allowed": null
}
Since this door lock operates on the Z-Wave network, the parentDeviceId field tells us what device this door lock is associated with (a GET request to this parent device ID tells us this parent device is a SmartThings v3 Hub).
Notice the Components listed for this device. These Components help make up the Device Profile associated with this device. In the next sections, we look at Device Profiles, Capabilities, and Device Configurations and Presentations.