Configuration
Users are guided through the SmartApp installation process via configuration screens.
The configuration process provides user with basic information about the SmartApp, and requests any information or access to devices the SmartApp may need.
This process triggers the CONFIGURATION lifecycle event.
Your app must handle the configuration lifecycle by:
- Providing basic information about the app itself.
- Providing the configuration data that represents the information needed from the user to install your app.
Configuration Request Basics
During the configuration lifecycle, your app will receive a request with a JSON payload with a lifecycle of "CONFIGURATION" and a configurationData object.
The configuration lifecycle has two phases: INITIALIZE and PAGE, discussed in detail below.
{
  "lifecycle": "CONFIGURATION",
  "configurationData": {...}
}
The contents of configurationData will vary depending on the phase and any configuration inputs already entered by the user.
The general flow of the configuration phase is shown below (for a two-page configuration process):
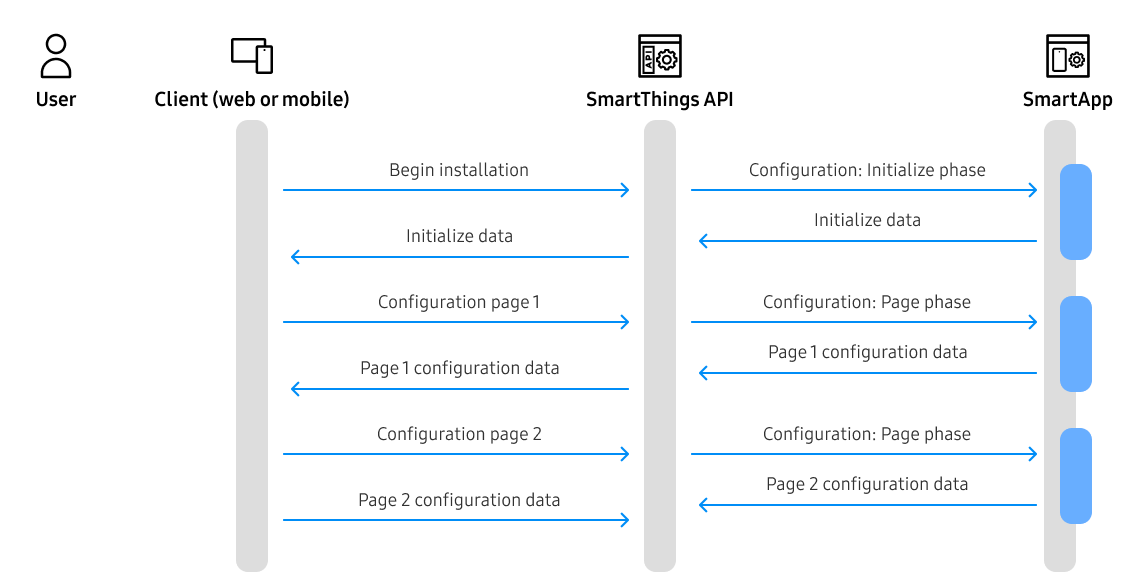
INITIALIZE phase
The INITIALIZE phase occurs at the beginning of the configuration lifecycle, as the user begins the installation and configuration process.
During the INITIALIZE phase, your SmartApp will receive a request with a JSON payload:
{
  "lifecycle": "CONFIGURATION",
  "executionId": "85f0047b-bb24-8eeb-da11-cb6e2f767322",
  "locale": "en",
  "version": "0.1.0",
  "configurationData": {
    "installedAppId": "8a0dcdc9-1ab4-4c60-9de7-cb78f59a1121",
    "phase": "INITIALIZE",
    "pageId": "",
    "previousPageId": "",
    "config": {

    }
  },
  "settings": {

  }
}
Your app must respond with JSON specifying basic information about your app, including the permissions required to configure it, and the ID of the first configuration page.
An example response for a SmartApp that requires configuration access to a user's devices and the ability to gather scheduling data might look like:
{
  "configurationData": {
    "initialize": {
      "name": "On When Open\/Off When Shut WebHook App",
      "description": "On When Open\/Off When Shut WebHook App",
      "id": "app",
      "permissions": [],
      "firstPageId": "1"
    }
  }
}
The id must be unique among any other settings as defined below.
You should specify the permissions your app will need during the install process. See Authorization and Permissions for more information.
PAGE phase
All information the user may configure for your SmartApp is organized in pages. A SmartApp may have one to many pages.
For each defined page, the PAGE phase of a configuration lifecycle will occur.
During the PAGE phase, your app will receive a request with a JSON payload like:
{
  "lifecycle": "CONFIGURATION",
  "executionId": "85f0047b-bb24-8eeb-da11-cb6e2f767322",
  "locale": "en",
  "version": "0.1.0",
  "configurationData": {
    "installedAppId": "8a0dcdc9-1ab4-4c60-9de7-cb78f59a1121",
    "phase": "PAGE",
    "pageId": "1",
    "previousPageId": "",
    "config": {
      "app": [
        {

        }
      ]
    }
  },
  "settings": {

  }
}
As the user progresses through pages, each page will generate a configuration lifecycle event, and the requested page can be found in the configurationData object on the request. Your SmartApp is responsible for responding with the configuration data for the requested page.
A page must specify complete: true to indicate it is the last page in the configuration process.
Sections and settings
Each page is composed of one or more sections, each containing a settings array with one or more setting(s).
An example response to a configuration lifecycle request for a single-page configuration would look like:
{
  "configurationData": {
    "page": {
      "pageId": "1",
      "name": "On When Open\/Off When Shut WebHook App",
      "nextPageId": null,
      "previousPageId": null,
      "complete": true,
      "sections": [
        {
          "name": "When this opens\/closes...",
          "settings": [
            {
              "id": "contactSensor",
              "name": "Which contact sensor?",
              "description": "Tap to set",
              "type": "DEVICE",
              "required": true,
              "multiple": false,
              "capabilities": [
                "contactSensor"
              ],
              "permissions": [
                "r"
              ]
            }
          ]
        },
        {
          "name": "Turn on\/off this light...",
          "settings": [
            {
              "id": "lightSwitch",
              "name": "Which switch?",
              "description": "Tap to set",
              "type": "DEVICE",
              "required": true,
              "multiple": false,
              "capabilities": [
                "switch"
              ],
              "permissions": [
                "r",
                "x"
              ]
            }
          ]
        }
      ]
    }
  }
}
Multiple pages
If your app requires multiple configuration pages, each response to the configuration lifecycle should specify nextPageId, previousPageId, and complete as necessary. A configuration request will be made to your app for each page, based upon the nextPageId and previousPageId.
An example response to a configuration lifecycle request for the first page of a two-page configuration would look like:
{
  "configurationData": {
    "page": {
      "pageId": "1",
      "name": "On When Open\/Off When Shut WebHook App",
      "nextPageId": "2",
      "previousPageId": null,
      "complete": false,
      "sections": [
        {
          "name": "When this opens\/closes...",
          "settings": [
            {
              "id": "contactSensor",
              "name": "Which contact sensor?",
              "description": "Tap to set",
              "type": "DEVICE",
              "required": true,
              "multiple": false,
              "capabilities": [
                "contactSensor"
              ],
              "permissions": [
                "r"
              ]
            }
          ]
        }
      ]
    }
  }
}
Upon advancing to the second page, another configuration lifecycle event occurs, and our app would respond to this request:
{
  "configurationData": {
    "page": {
      "pageId": "2",
      "nextPageId": null,
      "previousPageId": "1",
      "complete": true
      "name": "Turn on\/off this light...",
      "settings": [
        {
          "id": "lightSwitch",
          "name": "Which switch?",
          "description": "Tap to set",
          "type": "DEVICE",
          "required": true,
          "multiple": false,
          "capabilities": [
            "switch"
          ],
          "permissions": [
            "r",
            "x"
          ]
        }
      ]
    }
  }
}
The last page must specify complete: true to indicate that the SmartApp configuration will be completed on this page.
Settings
Each section is composed of one or more settings, which define the type of information to gather from the user (or, in the case of the paragraph setting, display-only information).
The type of setting is denoted by the type field in the setting object.
The settings array must be inside a sections array.
Device setting
Use a DEVICE setting when your app requires the user to select one or more devices.
"settings": [
  {
    "id": "contactSensor",
    "name": "Which contact sensor?",
    "description": "Tap to set",
    "type": "DEVICE",
    "required": true,
    "multiple": false,
    "capabilities": ["contactSensor"],
    "permissions": ["r"]
  }
]
Devices that match the specified capabilities will be eligible for selection.
If multiple values are specified, only devices matching all requested capabilities will be eligible.
When the user subscribes to a Capability and selects the device(s), in the SmartApp, while receiving the device events, the type of the value will correspond to the attribute type defined in the Capability.
Your app should specify the appropriate permissions it requires of the device via the permissions field.
The available permission values are:
| Permission | Description |
|---|---|
| "r" | Read access. The app may read device attributes, but not execute commands on the device. |
| "x" | Execute access. The app may execute command on the device. |
| "w" | Write access. The app may update data about the device itself. |
Permissions are independent (i.e., execute permission does not also grant read permission); multiple permissions may be specified.
Text setting
Use the TEXT setting when your app requires free-form text input.
"settings": [
  {
    "id": "myTextSetting",
    "name": "Enter some text",
    "description": "Tap to set",
    "type": "TEXT",
    "required": true,
    "defaultValue": "Some default value"
  }
]
BOOLEAN setting
Use the BOOLEAN setting when your app requires a true/false input.
"settings": [
  {
    "id": "myBooleanSetting",
    "name": "True or false?",
    "description": "Tap to set",
    "type": "BOOLEAN",
    "required": true,
    "defaultValue": "true"
  }
]
ENUM setting
The ENUM setting can be used to allow the user to select one or more options from a predefined list.
"settings": [
  {
    "id": "myEnumSetting",
    "name": "Choose what applies",
    "description": "Tap to set",
    "type": "ENUM",
    "required": true,
    "multiple": true,
    "options": [
      {
        "id": "option-1",
        "name": "Option 1"
      },
      {
        "id": "option-2",
        "name": "Option 2"
      }
    ]
  }
]
An ENUM setting may also group a set of its options by specifying groupedOptions:
"settings": [
  {
    "id": "myGroupedEnumSetting",
    "name": "Choose what applies",
    "description": "Tap to set",
    "type": "ENUM",
    "required": true,
    "multiple": true,
    "groupedOptions": [
      {
        "name": "Group 1",
        "options": [
          {
            "id": "option-1",
            "name": "Option 1"
          },
          {
            "id": "option-2",
            "name": "Option 2"
          }
        ]
      },
      {
        "name": "Group 2",
        "options": [
          {
            "id": "option-3",
            "name": "Option 3"
          },
          {
            "id": "option-4",
            "name": "Option 4"
          },
          {
            "id": "option-5",
            "name": "Option 5"
          }
        ]
      }
    ]
  }
]
LINK setting
Use the LINK setting when your app needs to provide a link to an external resource.
"settings": [
  {
    "id": "myLinkSetting",
    "name": "Visit the following link",
    "description": "Tap to visit",
    "type": "LINK",
    "url": "https://some-site-url",
    "image": "https://some-image-url"
  }
]
PAGE setting
The PAGE setting allows the user to jump to a specific configuration page.
"settings": [
  {
    "id": "myPageSetting",
    "name": "Choose what applies",
    "description": "Tap to set",
    "type": "PAGE",
    "page": "page-id",
    "image": "https://some-image-url"
  }
]
IMAGE setting
The IMAGE setting allows for the display of an image. Image width and height are automatically controlled using CSS styles for a responsive design.
"settings": [
  {
    "id": "myImageInput",
    "name": "Choose what applies",
    "description": "Tap to set",
    "type": "IMAGE",
    "image": "https://some-image-url"
  }
]
ICON setting
Use the ICON setting to display an icon.
"settings": [
  {
    "id": "myIconInput",
    "name": "Some icon information",
    "description": "Some description",
    "type": "ICON",
    "image": "https://some-image-url"
  }
]
TIME setting
Use the TIME setting to allow the user to input a specified time.
"settings": [
  {
    "id": "myTimeInput",
    "name": "Choose a time",
    "description": "Tap to set",
    "type": "TIME"
  }
]
PARAGRAPH setting
Use the PARAGRAPH setting to display some text to the user.
"settings": [
  {
    "id": "myParagraphSetting",
    "name": "Some information title",
    "description": "Some description",
    "type": "PARAGRAPH",
    "defaultValue": "This is the information to display."
  }
]
EMAIL setting
Use the EMAIL setting to request an email address from the user.
"settings": [
  {
    "id": "myEmailSetting",
    "name": "Enter an email address",
    "description": "Tap to set",
    "type": "EMAIL"
  }
]
DECIMAL setting
Use the DECIMAL setting to request a decimal value from the user.
"settings": [
  {
    "id": "myDecimalSetting",
    "name": "Enter a decimal value",
    "description": "Tap to set",
    "type": "DECIMAL"
  }
]
NUMBER setting
Use the NUMBER setting to request a number value from the user.
"settings": [
  {
    "id": "myNumberSetting",
    "name": "Enter a number",
    "description": "Tap to set",
    "type": "NUMBER"
  }
]
PHONE setting
Use the PHONE setting to request a phone number from the user.
"settings": [
  {
    "id": "myPhoneSetting",
    "name": "Enter a phone number",
    "description": "Tap to set",
    "type": "PHONE"
  }
]
OAUTH setting
Use the OAUTH setting when your app requires OAuth authentication with a third-party service.
- The
browseroption can be enabled if you prefer to open a browser window to execute the authentication flow, giving users access to their stored sessions. - The
urlTemplateis a URL template that will be used as the callback URL during the OAuth flow with the third-party. The OAuth callback parameter must have the URL encoded value of the OAuth callback url for SmartThings Cloud:"https://api.smartthings.com/oauth/callback".
"settings": [
{
"id": "myOauthSetting",
"name": "Authenticate with the third party service",
"description": "Tap to set",
"type": "OAUTH",
"browser": false,
"urlTemplate": "http://www.some-third-party.com/oauth?param1=1¶m2=2&callback=https%3A%2F%2Fapi.smartthings.com%2Foauth%2Fcallback",
}
]
All settings values, regardless of their value type, are sent as strings.
If your authorization scenario requires you to intercept and append additional data to the callback URL, you must not modify or remove the state parameter. For your SmartApp to receive additional linking data, you may include additional parameters, ensuring that state remains intact. This allows SmartThings to route your additional parameter data back to your SmartApp. These parameters can have any name, excluding state. It is recommended to Base64Encode the parameter values.
state is an opaque value used by the client to maintain state between the request and callback. The authorization server includes this value when redirecting the user-agent back to the client. See the OAuth 2.0 specification.
Upon receiving your OAuth callback data event, your SmartApp can parse the extra data parameters from the urlPath property to retrieve these parameters from the callback.
Getting settings values during configuration
All input values for previously completed pages are available on the request.
Each setting value is stored in the config object of the configurationData object.
The field name is the setting ID.
All settings values, regardless of their value type, are sent as strings.
Consider the case of a two-page configuration, where the user has entered in a value for setting on the first page with ID "minutes". When the user advances to the second page, the request to the SmartApp would look like:
{
  "lifecycle": "CONFIGURATION",
  "executionId": "ce3975c1-0d03-3777-5250-0e61b15ad1d4",
  "locale": "en",
  "version": "0.1.0",
  "configurationData": {
    "installedAppId": "58065067-52b9-49a5-a378-ce3871bc710b",
    "phase": "PAGE",
    "pageId": "2",
    "previousPageId": "1",
    "config": {
      "app": [
        {}
      ],
      "minutes": [
        {
          "valueType": "STRING",
          "stringConfig": {
            "value": "3"
          }
        }
      ]
    }
  }
}
Note that all config entries are stored as arrays; in the case of single-entry settings this will be a one-item array. Multiple-entry settings (e.g., selecting multiple devices for a single setting) will contain all configured inputs.
Configuration value types
Configuration values may be one of two types, as denoted by the valueType: STRING or DEVICE.
Each value type is associated with a config object for that type as summarized in the following table:
| Value type | Config name |
|---|---|
| "STRING" | "stringConfig" |
| "DEVICE" | "deviceConfig" |
STRING type
Any non-device setting type entered by the user will be returned as a STRING type, with a stringConfig object containing the value entered.
{
  "config": {
    "minutes": [
      {
        "valueType": "STRING",
        "stringConfig": {
          "value": "3"
        }
      }
    ]
  }
}
Recall that all non-device setting inputs, regardless of their type, are stored as strings.
DEVICE type
Devices selected by the user will be returned as a DEVICE type, with a deviceConfig object containing information about the device selected:
{
  "config": {
    "theSwitch": [
      {
        "valueType": "DEVICE",
        "deviceConfig": {
          "deviceId": "31192dc9-eb45-4d90-b606-21e9b66d8c2b",
          "componentId": "main"
        }
      }
    ]
  }
}
Settings dependencies
In some circumstances, the presence of, or available options for, one setting may depend on the value chosen for another setting. In these cases, your app can inspect the value(s) entered for a given setting and return the appropriate configuration data given the previously-entered value.
Dependent settings must be on separate pages.
Consider the scenario for a SmartApp that turns a light on when a chosen triggering event occurs. For example, the user may wish to turn the light on when a contact sensor is opened, or when motion is detected.
The following Node.js example shows how this may be accomplished.
const express = require('express');
const bodyParser = require('body-parser');
const request = require('request');

app.use(bodyParser.json());

app.post('/', function(req, resp) {
  let evt = req.body;
  let lifecycle = evt.lifecycle;

  switch(lifecycle) {
    case 'CONFIGURATION': {
      let res = handleConfig(evt.configurationData);
      response.json({statusCode: 200, configurationData: res});
      break;
    }
  }
});

function handleConfig(event) {
  if (!event.config) {
    throw new Error('No config section set in request.');
  }
  let config = {};
  const phase = event.phase;
  const pageId = event.pageId;
  const settings = event.config;
  switch (phase) {
    case 'INITIALIZE':
      config.initialize = createConfigInitializeSetting();
      break;
    case 'PAGE':
      config.page = createConfigPage(pageId, settings);
      break;
    default:
      throw new Error(`Unsupported config phase: ${phase}`);
      break;
  }
  return config;
}

function createConfigInitializeSetting() {
  return {
    name: 'Turn a light on when a trigger occurs',
    description: 'Turn a light on when a trigger occurs',
    id: 'app',
    firstPageId: '1'
  }
}

function createConfigPage(pageId, currentConfig) {
  const page = {
    pageId: '',
    name: 'Dependent settings',
    nextPageId: null,
    previousPageId: null,
    complete: false
  };

  switch (pageId) {
    case '1':
      page.pageId = '1';
      page.nextPageId = '2';
      page.sections = [
        {
          name: 'Turn on this light...',
          settings: [
            {
              id: 'lightSwitch',
              name: 'Which switch?',
              description: 'Tap to set',
              type: 'DEVICE',
              required: true,
              multiple: false,
              capabilities: ['switch'],
              permissions: ['r', 'x']
            }
          ]
        },
        {
          name: 'When this occurs...',
          settings: [
            {
              id: 'trigger',
              name: 'Select trigger',
              description: 'Tap to set',
              type: 'ENUM',
              required: true,
              multiple: false,
              options: [
                {
                  id: "contactTrigger",
                  name: "When contact sensor opens"
                },
                {
                  id: "motionTrigger",
                  name: "When motion occurs"
                }
              ]
            }
          ]
        }
      ]
      break;
    case '2':
      page.pageId = '2';
      page.previousPageId = '1';
      const trigger = currentConfig.trigger[0].stringConfig.value;
      if (trigger === "contactTrigger") {
        page.sections = [
          {
            name: 'When this contact sensor opens...',
            settings: [
              {
                id: 'contactSensor',
                name: 'Which contact sensor?',
                description: 'Tap to set',
                type: 'DEVICE',
                required: true,
                multiple: false,
                capabilities: ['contactSensor'],
                permissions: ['r']
              }
            ]
          }
        ]
        break;
      } else if (trigger === "motionTrigger") {
        page.sections = [
          {
            name: 'When motion is detected',
            settings: [
              {
                id: 'motionSensor',
                name: 'Which motion sensor?',
                description: 'Tap to set',
                type: 'DEVICE',
                required: true,
                multiple: false,
                capabilities: ['motionSensor'],
                permissions: ['r']
              }
            ]
          }
        ]
      }
      break;
    default:
      throw new Error(`unsupported page id: ${pageId}`);
  }
  return page;
}