OAuth Integrations
This topic covers the high-level process of integrating your apps with the SmartThings Platform using OAuth. This includes creating a SmartApp record to associate your OAuth-In SmartApp with the SmartThings Platform, and defining the OAuth permission scopes and redirect URIs used in the authorization code flow. After integrating with the SmartThings Platform, you can enable users of your platform to interact with the SmartThings Cloud through your app.
An existing OAuth-In SmartApp is required to utilize OAuth. We recommend creating your OAuth-In SmartApp before completing the integration process outlined below. If you have not yet created your SmartApp, you can still complete the integration process below, but will need to supply the target URL (hosting location) of your SmartApp using the SmartThings CLI before your SmartApp can be integrated with SmartThings.
Install Limits
By default, OAuth apps are enabled for up to 500 users.
For increased permissions, submit a request using this form.
User Authentication Flow
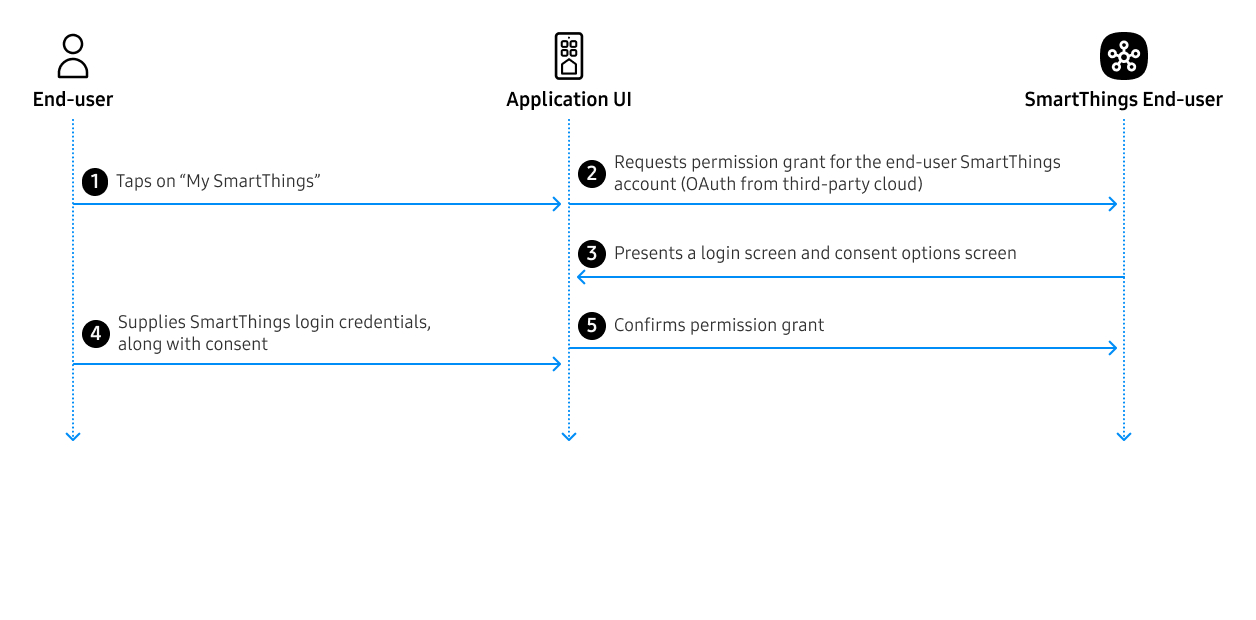
SmartThings uses OAuth2 for authentication. Authorization from your cloud service to the SmartThings Cloud is illustrated below:

A user taps on a "My SmartThings" icon in your application to begin the authorization flow with SmartThings, log into SmartThings, and grant the requested permissions to SmartThings.
Application Authentication Flow
Your application must authenticate with SmartThings using the OAuth 2.0 Authorization Code flow.
A user first taps on a "My SmartThings" icon in your application. Your application must then redirect the user to the SmartThings accounts server by calling an OAuth endpoint.
When the user grants permissions, they will be redirected to your server (at a specified redirect_uri) with an authorization code. For example:
https://my-development-app.com/oauth/callback?code=0ee7fcd0abed470182b02cd649ec1c98&state=abcdefgh
You can exchange this code for an access token in a subsequent POST request to SmartThings.
OAuth access tokens expire 24 hours from the time they are generated.
SmartThings will respond with a JSON body containing the access token and refresh token:
{
  "access_token": "a605e9d7-46a9-d867-955c-74063dooc4e9",
  "token_type": "bearer",
  "refresh_token": "5d8rr9d7-a988-0a45-955c-74068fh8ur0l",
  "expires_in": 299,
  "scope": "x:devices:* r:devices:*"
}
Cross-Site Request Forgery Protection
To prevent cross-site request forgery (CSRF), as detailed in the OAuth specification, the SmartThings OAuth server supports the state variable across requests.
Integrate Your OAuth-In SmartApp With the SmartThings Platform
Before creating an app record as described below, we recommend creating your OAuth-In SmartApp. If you have not yet created an OAuth-In SmartApp, you may still complete the app record process, but will need to supply the target URL (hosting location) of your SmartApp using the SmartThings CLI before your SmartApp can be fully integrated with SmartThings.
To integrate with the SmartThings Platform, you will use the SmartThings CLI to create a SmartApp record. The app record associates your OAuth-In SmartApp with the SmartThings Platform. After creating an app record, you will be provided with a Client ID and Client Secret for use in your SmartApp.
Begin by running smartthings.exe and selecting apps:create from the menu.
Begin by running smartthings apps:create and selecting the appropriate OAuth app.
You will be prompted to provide the following information:
- A display name for your integration. This display name will be shown to users in the SmartThings app.
- A description for your integration. The description will be shown to users when selecting your Integration from the SmartThings app.
- An icon image URL (optional). The image URL must be in HTTPS format. The icon image will be displayed to users in the SmartThings app.
- The target URL of the hosting location of your SmartApp. If you have not yet created your SmartApp, this field may be left blank and updated later.
- The permissions (scopes) required by your app. Required permissions for SmartThings API endpoints can be found in each endpoint's API documentation. Read more about permissions here.
- The redirect URIs required by your app, allowing you to receive webhook events. HTTPS format is required.
After entering the above information into the CLI and creating your SmartApp record, the CLI will provide you with a client_id and client_secret. Store these in a secure location - you will need to add this information to your OAuth-In SmartApp.