Device Configurations
A Device Configuration allows you to influence the display order of your device's Capabilities, configure the displayed default values, hide unused enum values of a Capability attribute, and more in each of the three main SmartThings app views:
- Dashboard view
- Detail view
- Automation view
After creating a Device Configuration, you will then generate a Device Presentation based on your Configuration. The Device Presentation is then associated with your Device Profile, and ultimately tells the SmartThings platform how to display your device.
If no Device Configuration is created:
- For Edge Drivers: when the Edge device is installed, a Device Presentation will automatically be generated and the order of device Capabilities will be the same as in the Device Profile.
- For Device Profiles created using the SmartThings API (manually creating a Device Profile from scratch), a Device Configuration must be created and a Device Presentation generated and associated with the Device Profile. If a Device Presentation is not specified in the Device Profile, the device will not appear correctly in the SmartThings app.
When using Custom Capabilities, A Capability Presentation must be configured for each view (dashboard, detail, automation) for each Capability used in each view.
Create Your Device Configuration
Create and update Device Configurations with the SmartThings API.
If you have a Device Profile ID, you can generate a template Device Configuration based on the Device Profile using the generateDeviceConfig API call.
Your Device Configuration JSON source is used to generate a Device Presentation (which is stored on the SmartThings platform) using the SmartThings API and is not included in your driver directory or device configuration file.
When developing an Edge Driver, you can embed your Device Configuration into your Edge Driver, eliminating the need to create a separate Device Configuration and Device Presentation
Example Views
This section provides example Device Configuration JSON files and the associated rendered output for each of the three main views (dashboard, detail, automation).
Dashboard View
The example below shows the Device Configuration dashboard view for a custom dimmer switch:
- Device Configuration
- Rendered Output
"dashboard": {
	"states": [
		{
			"component": "main",
			"capability": "switch",
			"version": 1,
			"values": [
				{
					"key": "switch.value",
					"enabledValues": [
						"on"
					]
				}
			]
		},
		{
			"component": "main",
			"capability": "switchLevel",
			"version": 1,
			"values": [
				{
					"key": "level.value",
					"range": [
						10,
						80
					],
					"step": 1
				}
			],
			"group": "dimmer"
		},
		{
			"component": "comp1",
			"capability": "switch",
			"version": 1,
			"group": "on/off"
		}

	],
	"actions": [
		{
			"component": "main",
			"capability": "switchLevel",
			"version": 1,
			"values": [
				{
					"key": "level.value",
					"range": [
						10,
						80
					],
					"step": 1
				}
			],
			"group": "dimmer"
		},
		{
			"component": "main",
			"capability": "switch",
			"version": 1,
			"values": [
				{
					"key": "switch.value",
					"enabledValues": [
						"on"
					]
				}
			]
		},
		{
			"component": "comp1",
			"capability": "switch",
			"version": 1,
			"group": "on/off"
		}
	]
}
Which renders in the dashboard view as:
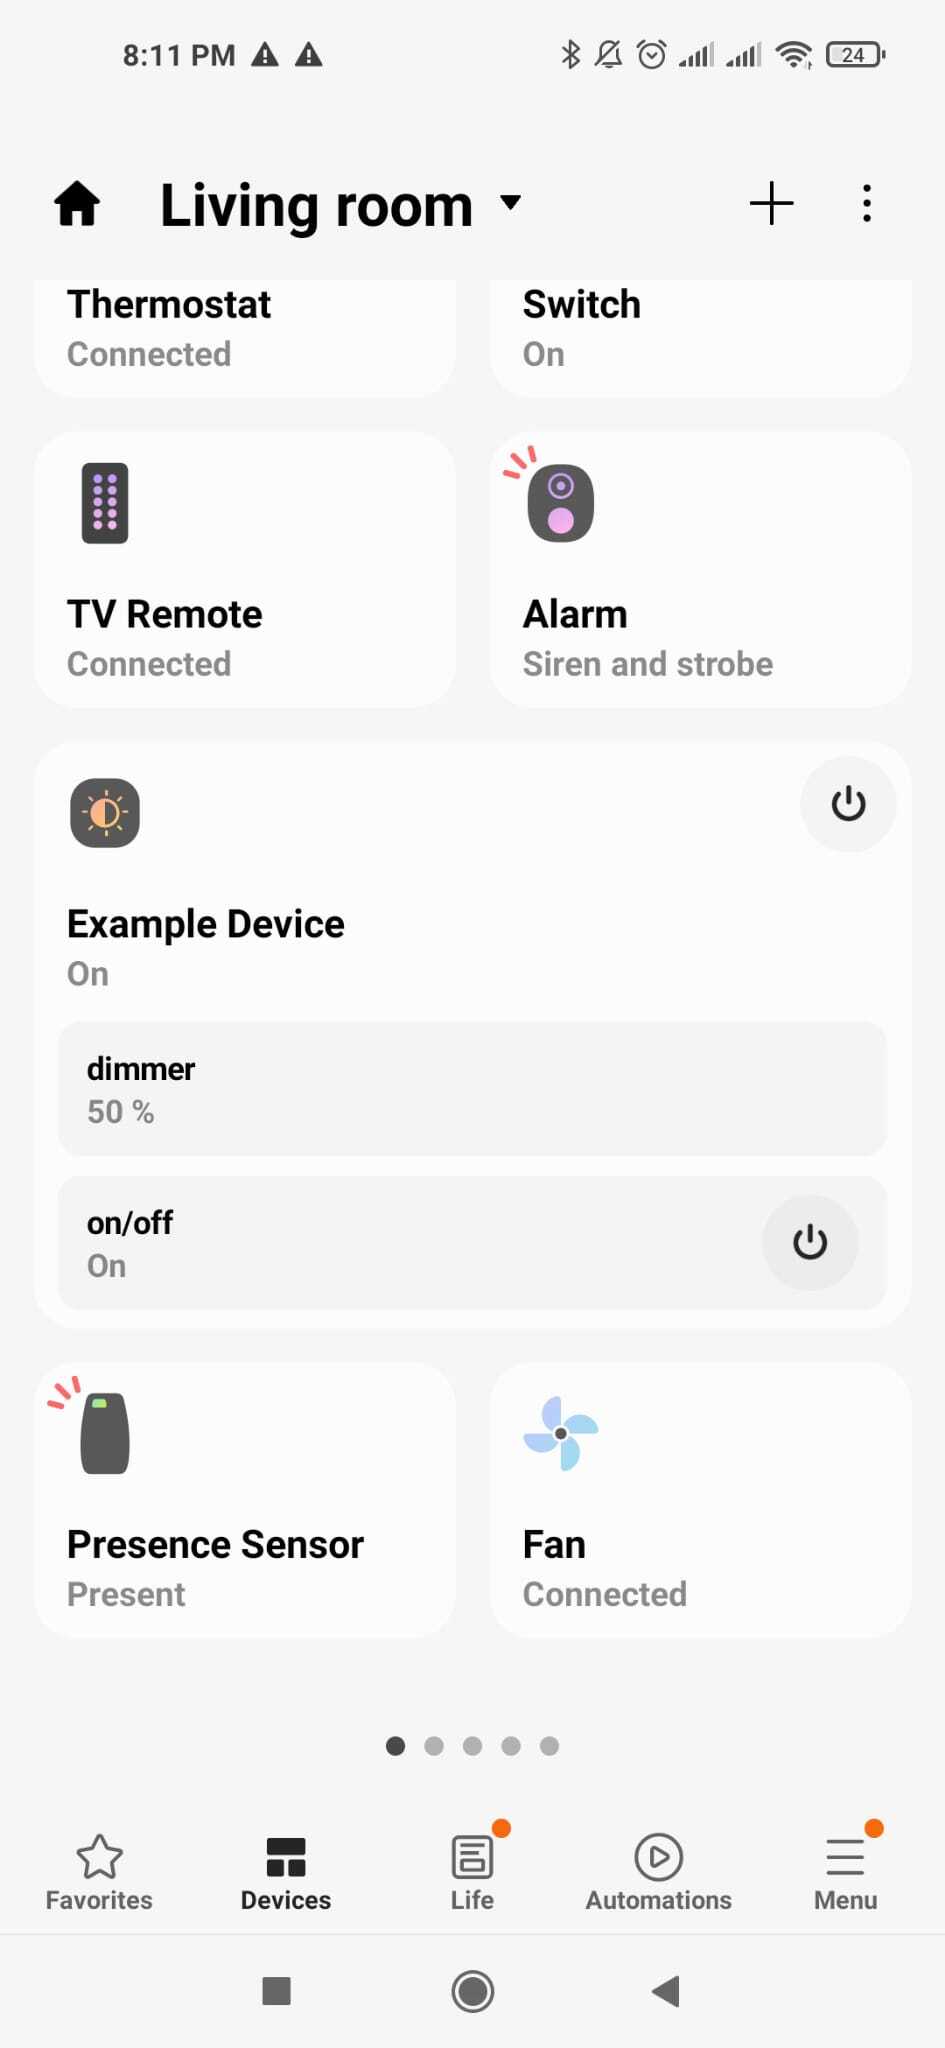
Grouping Components in the Dashboard View
The group property can be used to group multiple components into a single device dashboard view.
If no group property is specified, group is set to main by default.
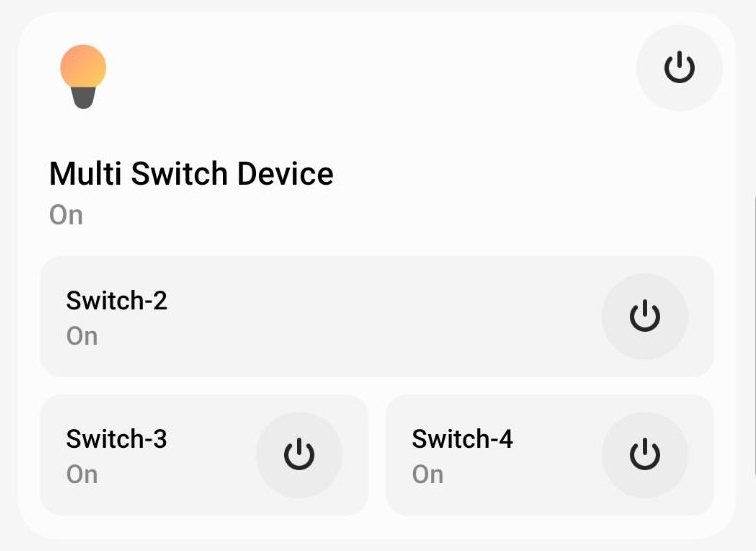
In the example below, a single device is shown in the dashboard view with four unique groups and device components displayed:
- Device Configuration
- Rendered Output
"dashboard": {
    "states": [
        {
            "component": "main",
            "capability": "switch",
            "version": 1,
            "idx": 0,
            "group": "main",
            "values": [],
            "composite": false
        },
        {
            "component": "switchTwo",
            "capability": "switch",
            "version": 1,
            "idx": 0,
            "group": "Switch-2",
            "values": [],
            "composite": false
        },
        {
            "component": "switchThree",
            "capability": "switch",
            "version": 1,
            "idx": 0,
            "group": "Switch-3",
            "values": [],
            "composite": false
        },
        {
            "component": "switchFour",
            "capability": "switch",
            "version": 1,
            "idx": 0,
            "group": "Switch-4",
            "values": [],
            "composite": false
        }
    ],
    "actions": [
        {
            "component": "main",
            "capability": "switch",
            "version": 1,
            "idx": 0,
            "group": "main",
            "inline": null
        },
        {
            "component": "switchTwo",
            "capability": "switch",
            "version": 1,
            "idx": 0,
            "group": "Switch-2",
            "inline": null
        },
        {
            "component": "switchThree",
            "capability": "switch",
            "version": 1,
            "idx": 0,
            "group": "Switch-3",
            "inline": null
        },
        {
            "component": "switchFour",
            "capability": "switch",
            "version": 1,
            "idx": 0,
            "group": "Switch-4",
            "inline": null
        }
    ],
    "basicPlus": []
}
Which renders in the dashboard view as:
Detail View
The SmartThings platform automatically organizes Capabilities into three sections in the detail view:
- Main Capability
The primary Capability of the device. The SmartThings platform automatically dictates this Capability's display background based on the status of the Capability Presentation.
- Status Capabilities
Includes Capabilities that provide only status information. The default display order follows the order defined by the device Configuration. Custom Capabilities with multiple attributes are expressed in a single group.
- Command Capabilities
Includes Capabilities that have input and control options. Command and status of a Capability are combined into a single display card. The default display order follows the order defined by the device Configuration. Custom Capabilities with multiple attributes are expressed in a single group.
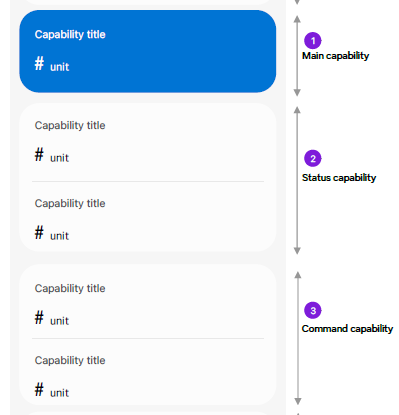
The Device Configuration influences how your device Capabilities are displayed in the SmartThings app detail view. However, the ordering of these three sections in the detail view cannot be changed.
We recommend using the same override values across all three views (Dashboard, Detail, and Automation) to ensure Capabilities are displayed in a consistent manner to the end user.
Detail View Example Configuration
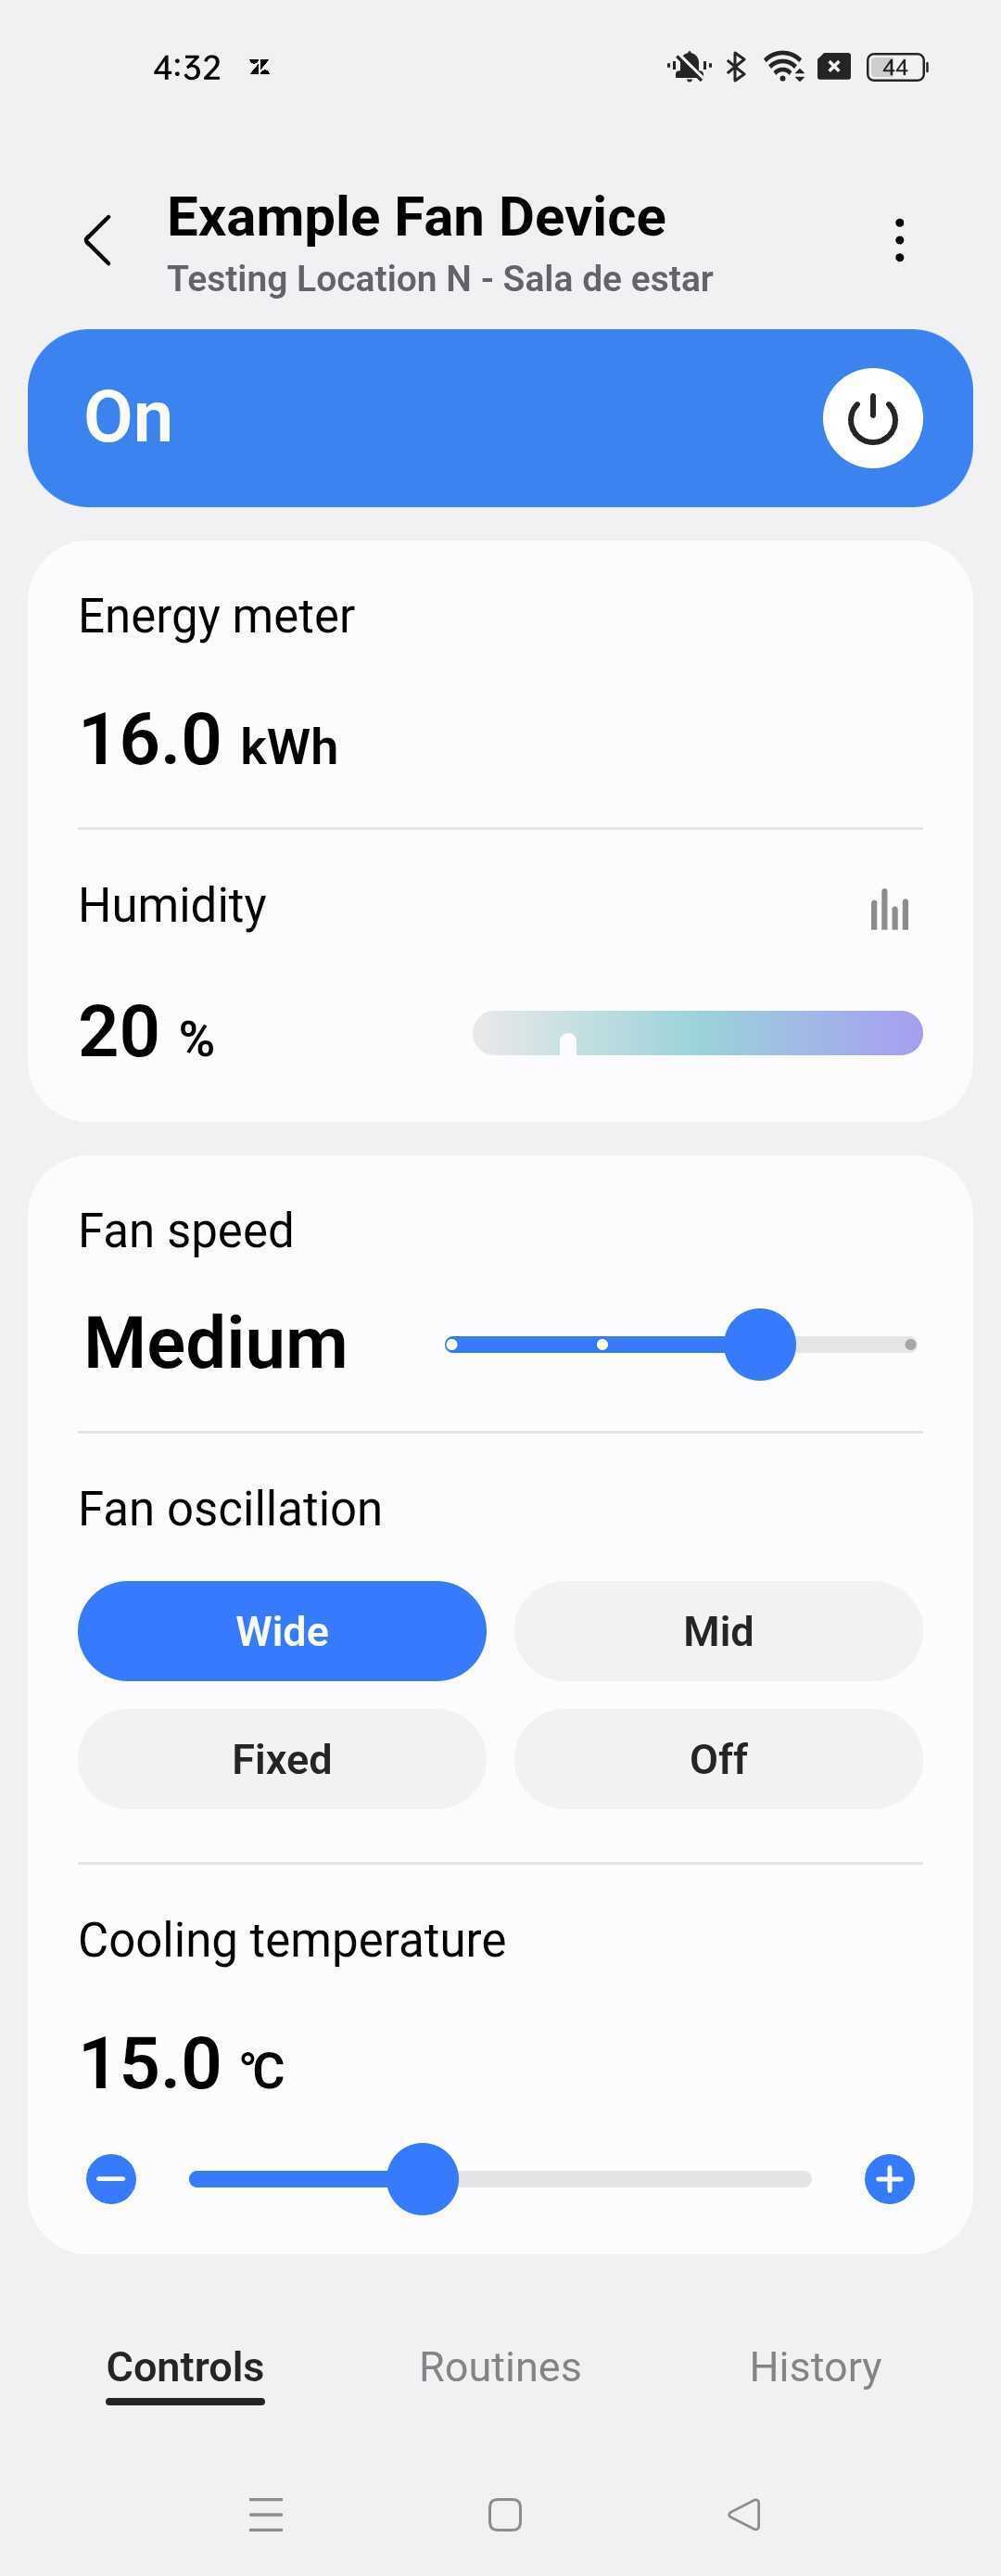
In the custom fan switch below, we specify the detail view behavior.
The visibleCondition ensures that the Fan Oscillation Mode Capability is only shown as an actionable item when specific criteria are met. In this case, the fan must be turned on and fanSpeed must be greater than 1, which is displayed as "Medium" speed to the end user.
- Device Configuration
- Rendered Output - visibleCondition Satisfied
- Rendered Output - visibleCondition Not Satisfied
"detailView": [
    {
        "component": "main",
        "capability": "switch",
        "version": 1,
        "values": [],
        "patch": []
    },
    {
        "component": "main",
        "capability": "fanSpeed",
        "version": 1,
        "values": [
            {
                "key": "fanSpeed.value",
                "range": [
                    0,
                    3
                ],
                "step": 1
            }
        ],
        "visibleCondition": {
            "capability": "switch",
            "version": 1,
            "component": "main",
            "value": "switch.value",
            "operator": "EQUALS",
            "operand": "on"
        },
        "patch": []
    },
    {
        "component": "main",
        "capability": "energyMeter",
        "version": 1,
        "values": [],
        "patch": []
    },
    {
        "component": "main",
        "capability": "relativeHumidityMeasurement",
        "version": 1,
        "values": [],
        "patch": []
    },
    {
        "component": "main",
        "capability": "fanOscillationMode",
        "version": 1,
        "values": [],
        "patch": [],
        "visibleCondition": {
            "capability": "fanSpeed",
            "version": 1,
            "component": "main",
            "value": "fanSpeed.value",
            "operator": "GREATER_THAN",
            "operand": 1
        }
    },
    {
        "component": "main",
        "capability": "thermostatCoolingSetpoint",
        "version": 1,
        "values": [],
        "patch": []
    }
]
When a visible condition is satisfied, it will render in the detail view as:
When a visible condition is not satisfied, it will render in the detail view as:

Automation View
The automation view for the device in the example below is similar to the dashboard and detail views. conditions is a new field introduced in this view, but is structured identically to the states and actions structure detailed above.
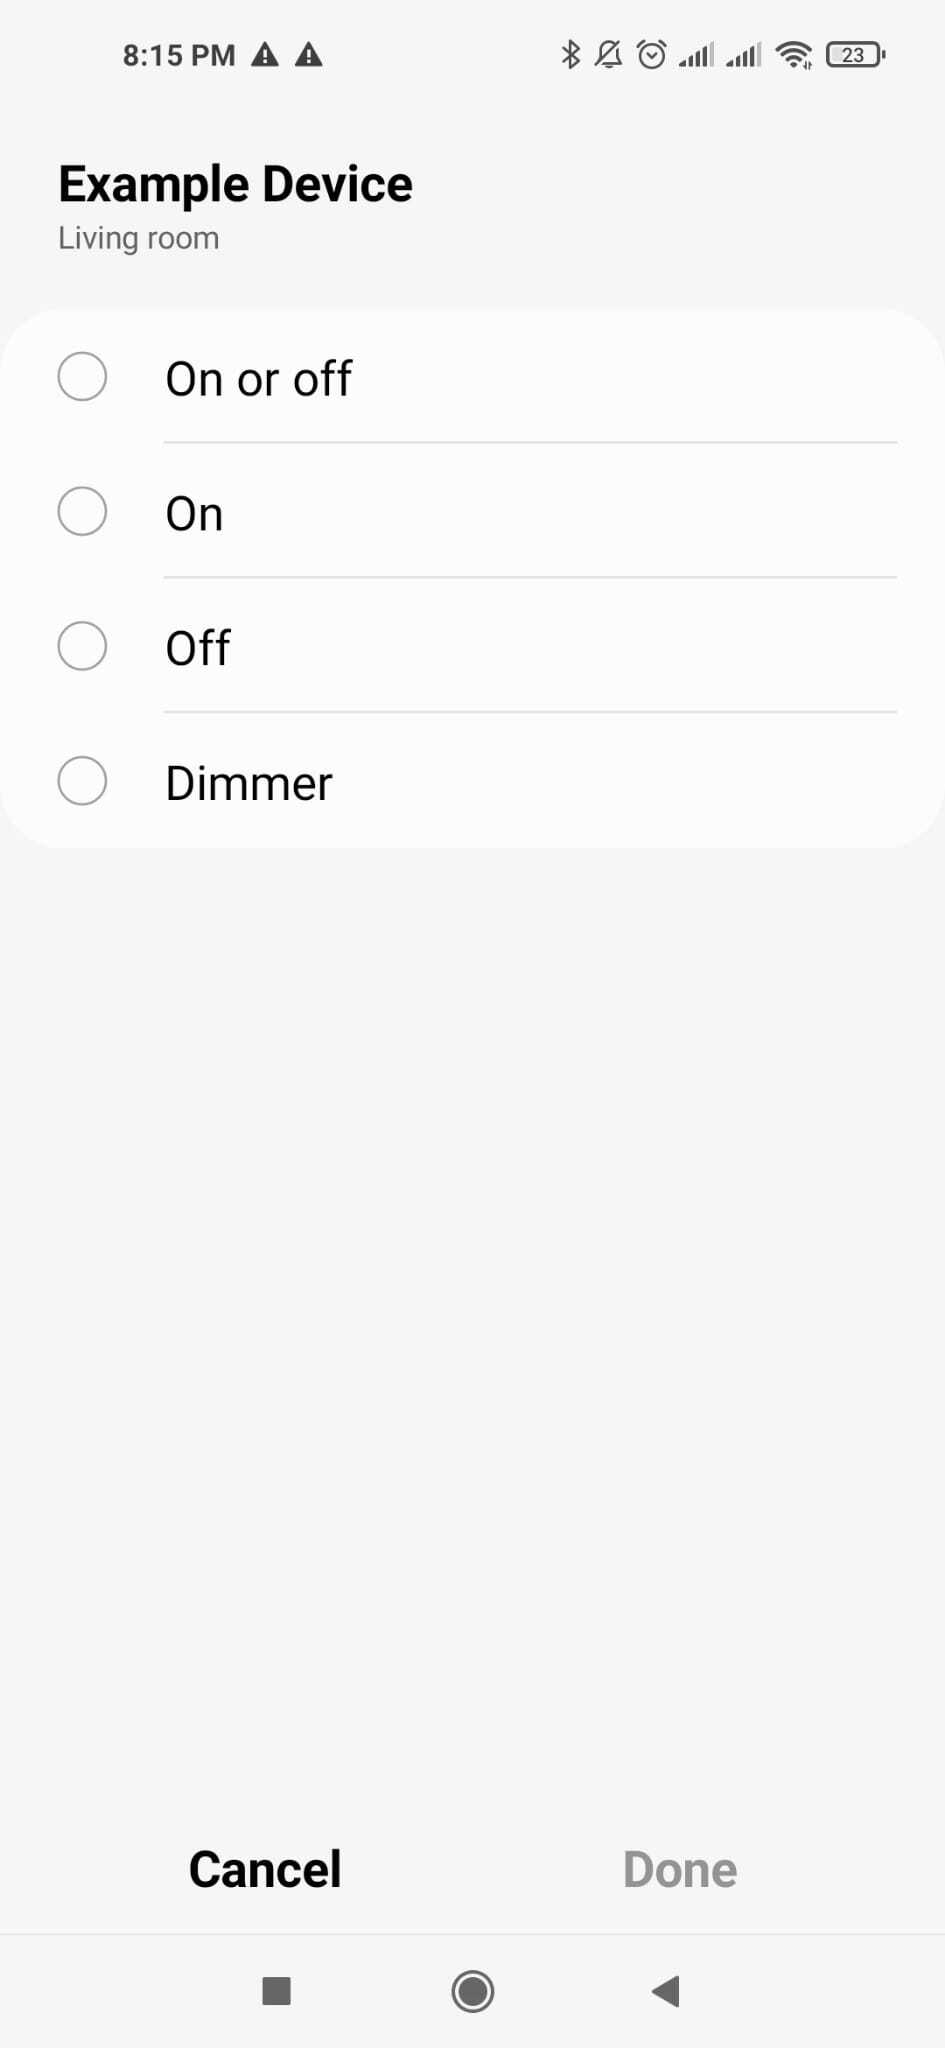
In the example below, we include both the on and off values in enabledValues. Because these are the only two valid values specified in the Capability, they are not required to be included, but are included here to illustrate usage of the field:
- Device Configuration
- Rendered Output
"automation": {
	"conditions": [
		{
			"component": "main",
			"capability": "switch",
			"version": 1,
			"values": [
				{
					"key": "switch.value",
					"enabledValues": [
						"on",
						"off"
					]
				}
			]
		},
		{
			"component": "main",
			"capability": "switchLevel",
			"version": 1,
			"values": [
				{
					"key": "level.value",
					"range": [
						10,
						80
					],
					"step": 1
				}
			]
		}
	],
	"actions": [
		{
			"component": "main",
			"capability": "switchLevel",
			"version": 1,
			"values": [
				{
					"key": "level.value",
					"range": [
						10,
						80
					],
					"step": 1
				}
			]
		},
		{
			"component": "main",
			"capability": "switch",
			"version": 1,
			"values": [
				{
					"key": "switch.value",
					"enabledValues": [
						"on",
						"off"
					]
				}
			]
		}
	]
}
Which renders in the automation view as follows. Selecting the "Dimmer" option below will present the user with a popup with your configured range (in this case, a range of 10-80).
Next Steps
After creating your Device Configuration, you are now ready to generate a Device Presentation and associate it with your device.